


Podiatry Instrument Cleaning
INTRODUCTION
This guide aims to provide useful information to complement your knowledge of decontamination of reusable podiatry instruments and keep your patients safe in the everyday clinical practice.
As 10% of 2.9 million of people with diabetes will have a diabetic foot ulcer at some point in their lives (Source: NICE guidelines, 2013 figures), it is of utmost importance you adhere to guidelines and recommendations to keep your patients safe from contamination and infection in your clinic. Failing to comply may result in litigation and lose of licence.
This guide is based on standards and recommendations for decontamination of reusable podiatry instruments gathered by The Society of Chiropodists and Podiatrists, the College of Podiatrists and the Institute of Chiropodists and Podiatrists in the UK. The UK government also provides sterilisation and infection control guidance via the Medicines and Healthcare Products Regulatory Agency (MHRA).
Decontamination is a combination of processes - cleaning, disinfection and sterilisation - that removes and/or destroys contamination and prevents micro-organisms or other contaminants reaching a susceptible site in sufficient quantities to cause infection or other undesirable response.
Thorough cleaning is a prerequisite for disinfection and sterilisation, as residual tissue and other deposits can protect infective organisms from destruction by the disinfectant or the sterilisation process. Manual cleaning is less consistent and effective than mechanical processes, which therefore, are preferred and recommended by the mentioned organisations.
This guide will help you choose the right equipment for your needs. To veiw Algeos Podiatry Instruments, check tham out in our store.
WHAT TYPE OF DECONTAMINATION EQUIPMENT DO I NEED?
Depends on the number of patients you may have per session per day, number of instruments available and the capacity by personnel to carry out the decontamination process. Some clinics run the autoclave after every patient, some others do it weekly. The capacity of the ultrasonic bath and vacuum autoclave need to be aligned as to fulfil the load of instruments, a bigger capacity will allow you to process higher loads of items, saving you time and effort.
When purchasing any decontamination equipment, it must be CE marked – like the equipment Algeos provide - this is the MHRA-approved standard.
Autoclaves
There are different types of autoclaves in the market. Wrapped, tubular or textile items are not able to be sterilized in a non-vacuum autoclave. Only vacuum autoclaves – like the ‘Class B’ autoclaves Algeos supply – are suitable for sterilising wrapped, unwrapped, solid or hollow instruments and porous loads. ‘Class S’ autoclaves do not operate with a fractionated vacuum, but with a simple pre- and post-vacuum. In practices which do not use narrow-bore and simultaneously long hollow-bodied instruments, a ‘Class S’ autoclave can be an alternative to the ‘Class B’ autoclave.
A printer and USB ports to export the data are very useful to ensure compliance and traceability of the process.
Installation must be carried out by a certified engineer. Servicing of autoclaves is recommended every 12-14 months to ensure they decontaminate properly. You may contact Algeos to arrange these services for you.
Always check the product specifications to ensure the type of performance that suits your needs. Algeos provide different capacity options from 7L to 22L. The following comparison table may assist you in choosing the right autoclave for you.
Ultrasonic Cleaners/Baths
Bench top ultrasonic cleaners – like the ones Algeo's supply - are slightly larger than table top/portable cleaners and can pack more cleaning power. They have different cleaning cycles, adjustable time settings and temperature control (0°C to heated 70°C or 80°C depending on the model). Additionally, some have user-friendly, clear panel controls, degas function, high-performance transducer, LED display and memory function.
For ultrasonic systems to provide the best cleaning results, a high-quality ultrasonic detergent – like the one Algeos supply - must be used. They reduce the surface tension in the liquid and enhance the ultrasonic activity within the tank. This aids in the removal and loosening of contamination from the surfaces of items that are being cleaned in the ultrasonic tank. Ensure you use the correct cleaning fluid depending on the materials you wish to clean (e.g. plastics, glass, metals and other materials but not aluminium or other soft metals which can be cleaned by a different type of detergent).
Choose an ultrasonic cleaner with a stainless steel basket and lid included in the purchase. You may also use trays made from polypropylene or polycarbonate.
Algeos provide different capacity options from 1.5L to 13L.
Water Distiller
A good water distiller with a highly efficient output rate of 1.5L of distilled water per hour and a capacity of 4L makes it a cost-effective way of producing your own distilled water for use in autoclaves and ultrasonic cleaners. Choose a water distiller with the inside of the boiling chamber and lid made of stainless steel as well as tested for electromagnetic compatibility (200/108/EC) and low voltage (2006/95/EC).
Instruments
It is recommended that all new instruments and devices are compatible with existing equipment (i.e. autoclavable) and can be decontaminated using processes compatible with the clinical activities in place. Practitioners should review their instruments and replace any that are faulty or would have difficulty decontaminating adequately.
Choose autoclavable instruments made of high-standard stainless steel (AISI-300 & 400 series) which are 100% biocompatible and 100% non-toxic – such as Algeos Instruments. They are autoclave and quality tested prior to dispatch from the factory.
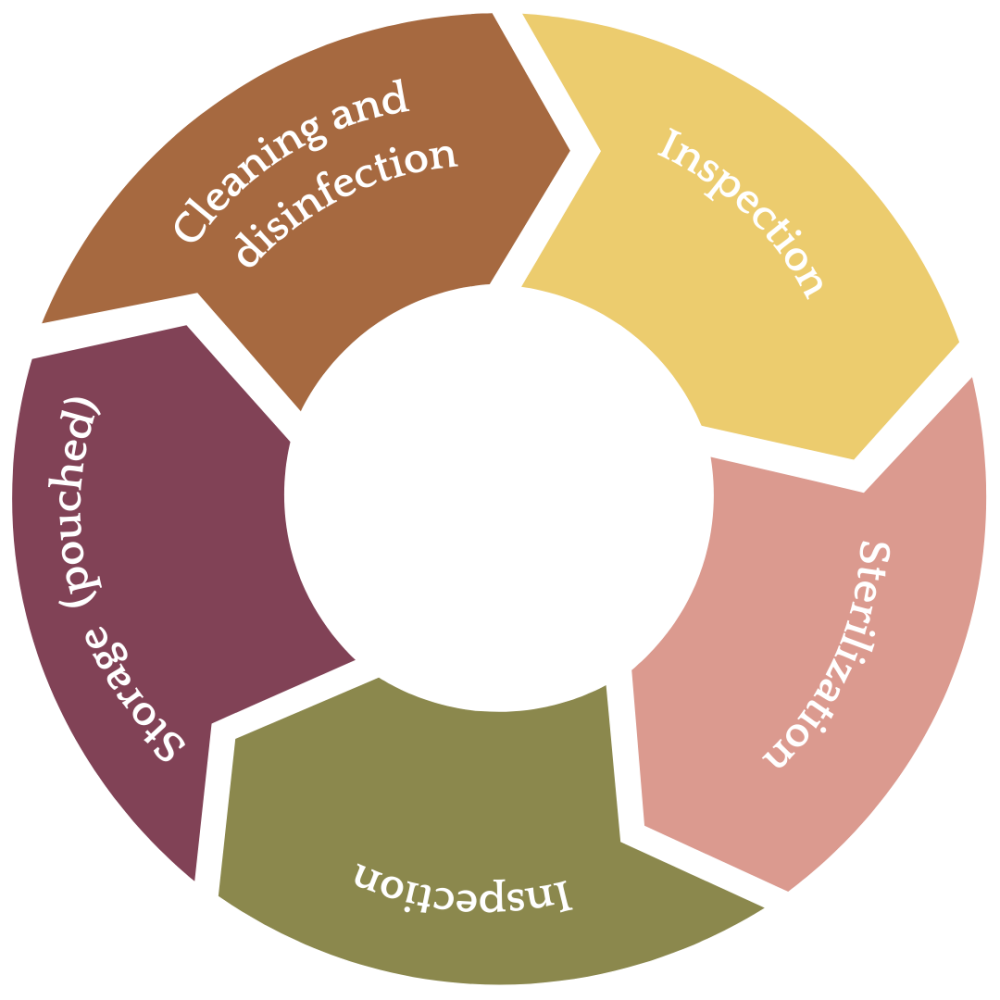
3. DECONTAMINATION PROCESS
This process, recommended by The Society of Chiropodists and Podiatrists, will help you to be compliant with the standards of decontamination:
The process should be reviewed and documented periodically to ensure that it continues to be effective. The person who has overall managerial responsibility for the practice is responsible for all matters concerning decontamination of reusable medical devices and their traceability (e.g. instruments pouch number used for each patient). The following details should be recorded: date, time, and operator’s name, contact information of the clinic, type of material sterilized/cycle, printouts of temperature, pressure, length of time the load is sterilized and biological indicators tests results.
Podiatrists must perform and record the results of periodic testing in accordance with HTM 2030 and manufacturer’s instructions. Service frequently as per manufacturer’s instructions and include checking the power output of the transducer in accordance with HTM 2030. Inspect instruments for residual debris after cleaning and repeat if necessary. Document all servicing and repairs.
Always wear personal protective equipment when using your equipment: lab coat, eye protection, closed-toe shoes, heat-resistant gloves to remove items, especially hot glassware.
Ultrasonic cleaner procedure
Fill the tank of the ultrasonic cleaner and use a detergent solution as recommended by the manufacturer at the beginning of each session. Run the ultrasonic cleaning bath for a few minutes to allow the solution to de-gas as recommended by the manufacturer prior to placing instruments in the basket and into the tank to run the cycle. If the solution becomes heavily contaminated it will be necessary to empty and change the solution during the session. An ultrasonic cleaner basket that stays up while drying is very useful.
Dry your instruments before placing them in the autoclave. Empty, clean and dry your ultrasonic cleaner at the end of the session/day.
To maintain your ultrasonic cleaner, drain the detergent and clean out the tank occasionally. The heavier gunk and dirt that falls off the parts cleaned will settle at the bottom of the tank and may not filter through the filtration system. This debris takes up space in the bath and dampens the ultrasonic waves, which makes cleaning less effective. Use a rag and wipe the tank bottom clean, or rinse it with clean, cool water. Change the filtration system’s filters regularly to keep contaminants out of the cleaning detergent, helping the system do its job better and faster.
Wipe or spray down parts that have heavy, greasy or loose contamination before placing them in the ultrasonic cleaner. The cleaner will remove all the dirt no matter how badly it is caked on but the dirt that comes off will deposit on the filters or tank bottom, which adds to your maintenance frequency requirement.
De-gas new detergent before you begin cleaning parts. Fresh solution will have some gasses—mostly air—trapped in it, and if these dissolved gasses aren’t removed, it will take the parts longer to get clean while the detergent degasses itself. Degassing is as simple as raising the temperature on the unit to the desired temperature and operating the cleaner without anything else in it for a short period of time (i.e.10 minutes).
Autoclave procedure
Sterilisation performance must be checked frequently: daily - this includes the steam penetration test - and weekly by the user and annually by a certified engineer.
- Packaging and Loading
Clean the drain strainer and fill in with distilled water before loading the autoclave. Always place items in a secondary container such as an autoclavable tray to place the items. Do not overload or package bags too tightly as steam needs to circulate freely. The container may be placed on its side to maximize steam penetration, do not overload or package bags tightly.
Do not allow bags to touch the interior walls of the autoclave to avoid melting of material. Select the right cycle for the material (e.g. for wrapped instruments) as per manufacturer instructions. Incorrect selection of cycle may damage the autoclave and its contents. Check chamber pressure gauge for a minimum pressure of 20 pounds per square inch (psi). Close and lock door.
The temperature must be verified for every load by a printout and this should be logged. The recommended cycle is 134°C for a minimum holding time of 3.5 minutes. Do not attempt to open the door while autoclave is operating. Fill out the paperwork to ensure traceability of the process. - Unloading
Make sure once the cycle has completed that both temperature and pressure have returned to a safe range. Stand back from the door as a precaution and carefully open door no more than 1 inch. This will release residual steam and allow pressure within liquids and containers to normalize.
Allow the autoclaved load to stand for 10 minutes in the chamber to allow steam to clear and items to cool down to room temperature before transporting. Inspect your instruments to ensure they are fit for purpose: they are not blunt, no rust, etc. Your instruments are not sterile and should be used on stock rotation ‘first in- first out’.
4. DO’S AND DON’TS FOR USING, MAINTAINING, AND WORKING SAFELY
- Always follow your manufacturer instructions.
- Separate instruments by metal type for cleaning and sterilisation. Incorrect detergent will damage your instruments.
- Autoclavable stainless steel instruments should be rinsed and soaked in use distilled water at pH=7.0 only, as well as during ultrasonic cleaning and autoclave sterilisation process.
- Used instruments and devices should be decontaminated immediately after use to minimise the growth of microorganisms on them and minimise the risk of cross infection. Thoroughly dry the instruments after rinsing to prevent spotting. Instruments that cannot be cleaned immediately should be immersed in cold distilled water to prevent coagulation when contaminants dry on the instrument. Use of hot tap water or disinfectant can also cause protein coagulation. Coagulated protein is difficult to remove and may reduce effective decontamination of the device.
- Special attention is required for cleaning locks, teeth, hinges and other difficult access areas of the instruments. For cleaning use nylon (not steel) brushes and warm (not hot) distilled water. An eraser or buffer may be used to rub off stains. If stainless steel instruments are not cleaned properly prior to storage or inadequately packed, rust may appear. Some instruments (e.g. clippers and nippers) need lubrication (e.g. paraffin oil) before storage and use to prevent rusting. Also, if the instruments have not been cleaned properly prior to use heated equipment, temperatures higher than 35°C may cause the organic debris to ‘cook’ (change its composition) and leave a stain on the item. Laser marked logos – such as the Algeos instruments – are not able to leave marks as laser imprints do not travel from one instrument to another.
- Ensure adequate determination of the end of life of your instruments. For example, instruments with rust should not be used and need to be replaced as there is a risk of infection to the patient.
- Never fill the tanks with any flammable liquids. They will vaporize, and could cause a fire or explosion, or release harmful gasses into the workspace. Avoid putting chlorine bleach into the tank. Bleach does not promote good cavitation activity.
- Never put any parts of your body into the ultrasonic cleaner while it is operating without PPE protection such as thermal gloves and goggles. The detergents can cause mild skin irritation, and the cleaning action can cause discomfort. In addition, the operating temperature of the solution and tank can cause burns.
- Keep parts off the bottom of the tank of the ultrasonic cleaner. Setting parts directly on the tank bottom increases the incident of cavitation erosion – pitting of the tank eventually causing the ultrasonic cleaner to leak. Use a basket, tray, or suspension system to hold parts in the unit.
- Make sure that the cycle of your equipment is set on the appropriate time, pressure, and temperature for the desired load of instruments/ other items to keep them in good condition.
- Don’t open the autoclave door after the machine has been turned on. Steam or water could escape and cause severe burns. Don’t spray down the outside of the tank, control box, or electrical box with water or other liquids. If the outside gets dirty, unplug the unit and wipe it down with a clean rag.
- Don’t overload the autoclave, as this can prevent steam circulation and fail to properly sterilise some of the instruments buried underneath. Instead, lay them in packets in one layer on each tray with space between them.
- If the autoclave does not pass the test, it should not be used until service has been conducted by a certified engineer and a validation test is successful. Never try to do your own repairs as you can damage the equipment and yourself. This will also invalidate the warranty.
- Never autoclave: Flammable, reactive, corrosive, toxic or radioactive materials, bleach, any liquid in a sealed container, any material contained in such a manner that it touches the interior surfaces of the autoclave, paraffin-embedded tissue. Incompatible materials are also: acids, bases and organic solvent, chlorides, sulphates, seawater, chlorine, non-stainless steel, polystyrene (PS), polyethylene (PE), low density (LDPE) and high-density polyethylene (HDPE), polyurethane.
The following chart can help you identify and prevent or remove many of the stains that typically show up on instruments during the cleaning process.
| Stain/Spot Colour | Possible Causes | Solutions |
| Brown/Orange | Bio-burden (tissue, blood, etc.) left on nippers. | Use an eraser/buffer to rub off the stain. Check cleaning procedures and ensure thorough rinsing. |
| Rust | Mixing instruments made of different metals in the same cleaning cycle. | Separate instruments by metal type for cleaning and sterilisation. |
| Black/Brown, with Pitting | Cold soaking of nippers. The detergent pH is too low. | Eliminate cold soaking and potential exposure to harsh chemicals. |
| Blue/Black | Mixing instruments made of different metals in the same cleaning cycle. | Separate instruments by metal type for cleaning and sterilisation. |
| Blue/Grey | Improper cold sterilisation. Chemical or mineral residue on instruments. | Check solution instructions and follow recommended procedures. |