


Diabetic Foot Model - Educational Tool for Clinics and Patients

Product Description
Diabetic Foot Ulcer Teaching Model
A realistic diabetic foot education model designed to help demonstrate ulcer development, diabetic complications and the importance of regular foot care in a clear, visual and memorable way.
What is it?
The 3 Ulcer Diabetic Foot Training Model is a realistic educational tool created to support teaching around diabetic foot complications. It forms part of the Diaped Educational Tools range and is intended for use in student education, clinical training and patient-facing explanation. Rather than relying only on diagrams or verbal descriptions, this model provides a three-dimensional way to show what diabetic foot damage can look like across different stages.
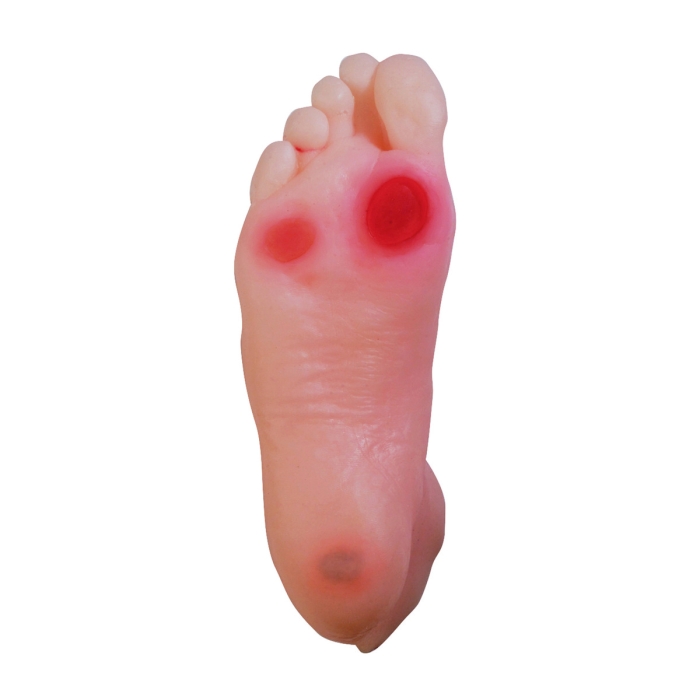
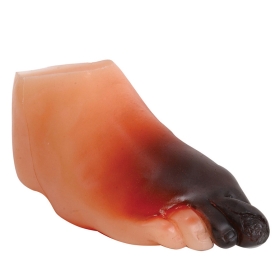
The model represents a foot affected by complications commonly associated with diabetes, including ulcer development and skin breakdown. It includes a stage 1 ulcer, a stage 2 ulcer and a stage 3 to 4 ulcer, along with a crack under the fold of the toe. This combination allows educators to compare early and more advanced tissue changes on one teaching aid, making it easier to explain progression and reinforce prevention messages.
Constructed from BIOLIKE 2 synthetic tissue, the model is designed to look realistic while being suitable for repeated use in educational settings. The surface detail helps learners and patients recognise warning signs that may otherwise be difficult to understand from printed material alone. It is also compact enough to transport between classrooms, clinics and outreach settings.
The model comes with an instruction card and carrying case, making it practical for storage, presentation and everyday handling. It is designed as a visual and tactile support for education rather than a replacement for clinical judgement.
Who is it for?
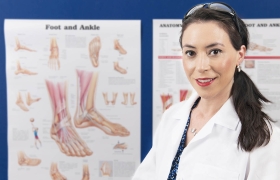
This model is suitable for a wide range of users involved in diabetic foot education. It is particularly useful for podiatry students, diabetes educators, healthcare trainers, lecturers, practice tutors and clinicians who need to explain diabetic complications in a way that is immediate and easy to understand.
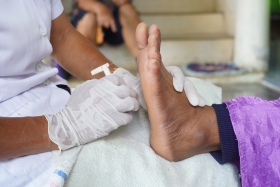
For educational institutions, it can support classroom learning by helping students identify different ulcer stages and recognise associated risk features. For clinics and community services, it may be used during one-to-one consultations or group sessions to help patients understand why routine foot checks, skin care and early reporting of changes matter.
It can also be valuable for carers and family education where visual demonstration supports better understanding. Some people find written explanations difficult to relate to, especially when discussing tissue damage or neuropathy. A physical model can make these concepts more concrete and easier to remember.
Because it is designed as a teaching aid, it is well suited to demonstrations, supervised practical sessions and structured patient communication. It is less appropriate where the goal is treatment simulation requiring invasive tools or where a dynamic functional model is needed.
What does it help with?
The model is designed to support education rather than treatment. Its main value lies in showing what diabetic foot complications may look like and helping learners connect clinical terminology with practical visual signs.
- Diabetic neuropathy education: helps explain why reduced sensation can allow damage to develop unnoticed.
- Ulcer staging awareness: shows different levels of ulcer severity in one model for easier comparison.
- Patient communication: can reduce misunderstanding when discussing skin breakdown, pressure areas and delayed presentation.
- Foot care teaching: supports conversations about daily inspection, skin checks and prompt reporting of changes.
- Podiatry training: gives students a realistic visual aid for guided teaching sessions.
- Clinical explanation: helps link diagnosis, risk factors and visible tissue change in a practical format.
In day-to-day use, that means the model can help turn abstract information into something more understandable. A patient may not fully grasp the seriousness of pressure, dryness, cracking or tissue breakdown from words alone. Seeing those changes represented on a model can support more informed conversations about prevention and self-care.
How does it work?
The teaching value of this model comes from visual realism and side-by-side comparison. By showing three ulcer stages and an additional crack under the toe fold, it helps the educator point to specific problem areas and describe what they represent. This can be useful when discussing how small changes may progress if pressure, poor sensation or delayed care are involved.
The BIOLIKE 2 synthetic tissue is designed to create a realistic appearance and feel, which supports both demonstration and engagement. Learners are often better able to retain information when they can see and handle an object rather than only read about it. In patient training, a realistic model may also help reinforce the importance of checking the whole foot, including less visible areas.
Because the model is portable and supplied with a carrying case, it can be brought into different teaching environments. The instruction card supports consistent use, while the model itself provides a clear focus point for discussion around diabetic complications, pressure damage, ulcer risk and routine preventive foot care.
Expected comfort / use timeline
First use
On first use, most educators will use the model as a guided visual aid, introducing each ulcer stage and the additional crack feature one by one. Learners and patients may find the realism helpful when linking theory to practice. The compact size also makes it easy to pass around during supervised teaching.
Short-term use (days)
During repeated sessions over several days, the model can support reinforcement of key themes such as daily checking, early reporting of skin changes and the risks linked to delayed presentation. In teaching settings, it may be used to compare ulcer severity, discuss neuropathy and highlight areas that are often overlooked during self-examination.
Ongoing use (weeks and beyond)
With appropriate care, the model can continue to support regular demonstrations over time. Ongoing benefit comes from consistent, careful handling, cleaning after use and proper storage in the carrying case. Light re-powdering before each session can help maintain the intended feel and prolong the usable life of the model.
Problem to solution overview
| Common problem | How the product helps |
|---|---|
| Students struggle to picture different ulcer stages from text alone | Shows stage 1, stage 2 and stage 3 to 4 ulcer development in one realistic model. |
| Patients do not fully understand the seriousness of diabetic foot complications | Provides a visual, tangible reminder of why foot care and early action matter. |
| Educators need a practical aid for demonstrations | Offers a compact, portable model that can be used in teaching rooms, clinics or outreach settings. |
| Important foot features are overlooked during explanation | Includes an additional crack under the toe fold to support discussion of less visible problem areas. |
| Printed materials alone are not engaging enough | Adds realistic shape, surface detail and tactile presence to improve understanding. |
| Models wear out too quickly with poor handling | Comes with care guidance, instruction card and carrying case to support longer service life. |
Key benefits
- Demonstrates multiple ulcer stages in a single teaching model for clearer comparison.
- Supports both student education and patient training in diabetic foot care.
- Realistic BIOLIKE 2 tissue helps make demonstrations more memorable and easier to understand.
- Compact size makes it practical for clinics, classrooms, training events and mobile education sessions.
- Includes a carrying case and instruction card to support convenient storage and consistent use.
- Useful for explaining diabetic neuropathy, skin damage and the importance of regular inspection.
Fit & comfort check
Although this is not a wearable product, correct handling still matters. The model should be used in a way that preserves its surface finish and teaching value.
- Treat the model as a teaching aid, not a demonstration prop for forceful handling.
- Use gentle contact only. The surface should be handled carefully, never roughly or aggressively.
- For longest life, keep the model clean, dry and lightly powdered before use where recommended.
- A good rule is to keep use secure and controlled, not harsh or damaging.
Common mistakes to avoid
- Using sharp fingernails or pointed instruments on the model, which can puncture or permanently mark the surface.
- Scrubbing the painted areas during cleaning, which may damage the finish and reduce realism.
- Allowing the model to come into contact with ink or printed materials, which may stain the surface.
- Assuming it can substitute for clinical assessment or live patient examination rather than being used as an educational support.
How to use
- Remove the model from its carrying case and inspect it before the session.
- Before use, lightly powder the model with talcum powder to help maintain a smooth feel.
- Use the instruction card to guide the key teaching points if needed.
- Introduce the foot as a diabetic complication training aid, then identify each ulcer stage and the crack under the toe fold.
- Explain how these features relate to diabetic neuropathy, reduced sensation, skin breakdown and the need for routine foot checks.
- Allow supervised viewing or handling where appropriate, taking care not to puncture or abrade the surface.
- After use, clean gently with mild soap and warm water.
- Pat dry with a clean cloth, re-powder the model and return it to the carrying case for storage.
Technical specifications
| Specification | Details |
|---|---|
| Product name | 3 Ulcer Diabetic Foot Training Model |
| Product type | Diabetic foot educational model |
| Range | Part of the Diaped Educational Tools collection |
| Representation | Foot model showing multiple ulcer stages and common diabetic foot features |
| Ulcer stages shown | Stage 1 ulcer, stage 2 ulcer, stage 3 to 4 ulcer |
| Additional feature | Crack under fold of toe |
| Material | BIOLIKE 2 synthetic tissue |
| Dimensions | 9cm x 24cm x 10cm |
| Pack contents | Model, instruction card and carrying case |
| Cleaning | Clean gently with mild soap and warm water after each use |
| Drying | Pat dry with a clean cloth and re-powder |
| Handling cautions | Do not scrub painted areas, do not puncture, and avoid contact with ink or printed materials |
Frequently asked questions
Is this model intended for patient education or student teaching?
It is suitable for both. It can be used as a training aid in podiatry education and as a visual tool when explaining a clinical diagnosis or diabetic foot complication to a patient.
Does the model show more than one ulcer stage?
Yes. It includes a stage 1 ulcer, a stage 2 ulcer and a stage 3 to 4 ulcer, allowing comparison across different levels of severity.
Is it a full-size foot model?
The product dimensions are 9 cm x 24 cm x 10 cm. It is designed to be compact enough for practical teaching and transport while still offering a realistic visual representation.
What material is it made from?
The model is made from BIOLIKE 2 synthetic tissue, chosen to provide a realistic appearance and feel for educational use.
How should it be cleaned after teaching sessions?
After each use, clean it gently with mild soap and warm water. Do not scrub the surface. Pat it dry with a clean cloth and re-powder it before storage or future use.
Can it be used with sharp tools for demonstration?
No. The model should not be punctured with fingernails or other sharp objects. It is intended for visual and tactile education rather than invasive procedural practice.
Why is powdering recommended before use?
Light powdering with talcum powder helps keep the surface smooth and may support the longevity and handling quality of the model during repeated demonstrations.
Complementary / pairing suggestions
This model pairs well with broader diabetic education tools used in podiatry, wound care and foot health teaching. It can sit alongside foot anatomy models, neuropathy teaching resources, patient information leaflets, pressure care discussion aids and general podiatry classroom materials. In a clinical education setting, it may also complement monofilament demonstration tools, footwear advice resources and other non-invasive diabetic foot risk education materials.
For tutors or clinicians building a structured teaching session, the model works particularly well as the visual centrepiece of a wider conversation about daily inspection, skin care, pressure awareness and when to seek professional assessment. Because it is portable, it can also be combined with presentation materials for outreach sessions, ward teaching or community diabetes education events.
Content credibility
Written by: Algeos Product & Clinical Content Team
Last reviewed: March 2026
This content is provided to support buyer guidance and product understanding. It is not a diagnosis, not a substitute for clinical training and not medical advice.
Frequently bought together
Sold: Each
Incl. VAT Exl. VAT
Sold: Set of 3
Incl. VAT Exl. VAT
Sold: Each
Incl. VAT Exl. VAT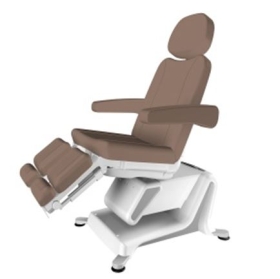
Sold: Per Chair
Incl. VAT Exl. VAT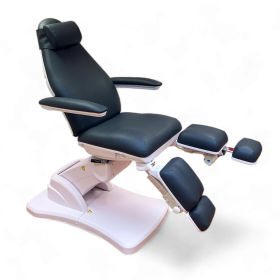
Sold: Per Chair
Incl. VAT Exl. VATSold: Per Chair
Incl. VAT Exl. VAT
Sold: Each
Incl. VAT Exl. VAT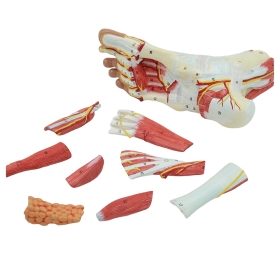
Sold: Each
Incl. VAT Exl. VATSold: Each
Incl. VAT Exl. VAT
Sold: Each
Incl. VAT Exl. VAT
Sold: Each
Incl. VAT Exl. VAT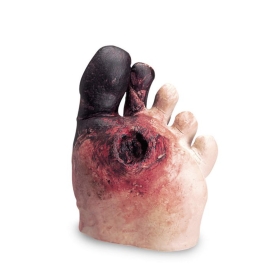
Sold: Each
Incl. VAT Exl. VAT
Sold: Each
Incl. VAT Exl. VAT
Sold: Each
Incl. VAT Exl. VAT
Sold: Each
Incl. VAT Exl. VAT
Sold: Each
Incl. VAT Exl. VAT
Sold: Each
Incl. VAT Exl. VAT
Sold: Each
Incl. VAT Exl. VAT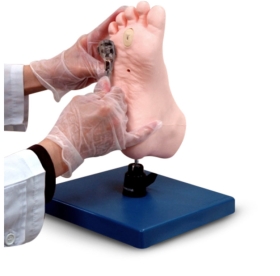
Sold: Each
Incl. VAT Exl. VAT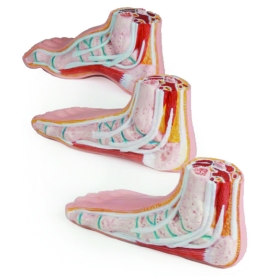
Sold: Set
Incl. VAT Exl. VATSold: Set
Incl. VAT Exl. VAT
Sold: With stand
Incl. VAT Exl. VAT
Sold: Each
Incl. VAT Exl. VAT